


This week’s challenge is Rainbow, featuring Tim Holtz products. That’s great. I luv Tim’s stuff, and have a ton of it! The first thing that comes to mind when I think of Tim Holtz is vintage and grunge. Hmm…I can’t wrap my mind around a vintage, grungy rainbow. But Tim’s stuff is also funky and fun. I CAN do a funky and fun rainbow! I decided on a psychedelic 70s theme, and who better to take on the trip but those Crazy Birds. The Crazy Birds are perfect for almost any occasion, in my opinion.

Hippie Birds
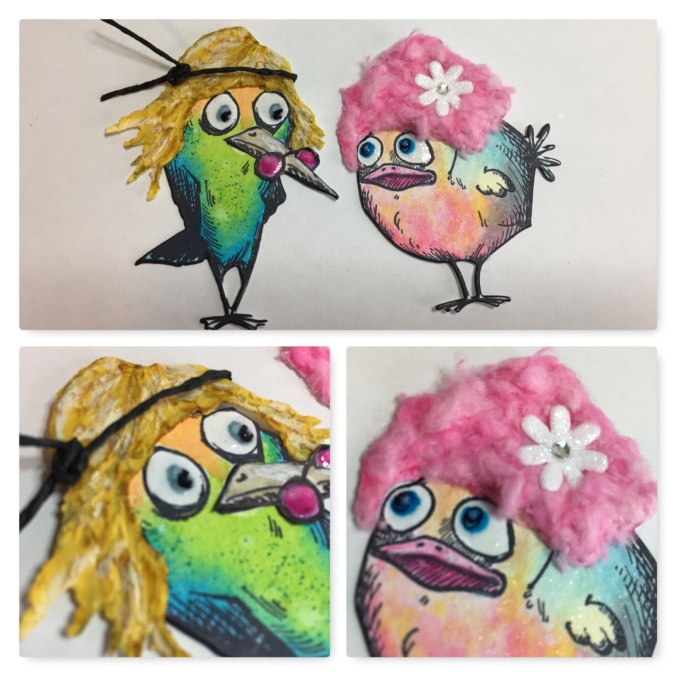
Sometimes I start with a background and sometimes I start with the focal point. This time, I started with the birds. I stamped the Crazy Birds on Distress Watercolor Cardstock and die cut them using the matching dies. I colored them with Distress Inks and a water brush:
- Dude: Carved Pumpkin, Mermaid Lagoon, and Twisted Citron
- Chick: Spun Sugar, Picked Raspberry, Tumbled Glass, Squeezed Lemonade
For their eyes, I used Distress Markers to give them a touch of color, then covered them with Ranger Glossy Accents. The dude got some speckles from a spritz of a Mermaid Lagoon Distress Marker, and the chick got some glitter with a Wink of Stella pen.
They were looking good, but……they needed something….they needed hippie hair! HEY TIM – we need Crazy Hair to go with our Crazy critters!!! Like a beehive (and cat-eye glasses), a mohawk, a surfer man-bun….and, a 70s shag and curly do!
In the meantime…. to give my little hippies some hair, I used tracing paper over the stamped and colored images to sketch out some rough shapes. I glued the tracing paper onto scrap white cardstock using Distress Collage Medium, let them dry, and then fussy-cut them out. I gave each a base coat of color using Distress Inks and a blending tool (Fossilized Amber for the dude and Picked Raspberry for the chick ).
- Dude: To complete the shag do’, I mixed Fossilized Amber Distress Ink with some Ranger Texture Paste using a palette knife and then slathered it on the cut out shape. I used the edge of knife to make some grooves (think hair layers). Once the hair was dry, I used Distress Markers in Fossilized Amber and Picket Fence to add some lowlights and highlights. I then added headband made of black twine. My dude was looking hip – but I decided he also needed some John Lennon glasses – so I pulled out the tracing paper again and traced his beak – this time adding a pair of glasses. Like before, I glued it on scrap cardstock, cut it out, then colored it using Distress Markers.
- Chick: For the pink curly ‘do, I cut up a cotton ball and mixed it with some Picked Raspberry Distress Ink . After the dyed cotton had dried, I glued it onto the cut-out hair shape. I just had to add a white flower (from my stash) to finish off her fabulous ‘do!
Here are some close-ups of the details.
Backgrounds and Finishing Touches
Now that I had my star characters, they needed the perfect backgrounds.
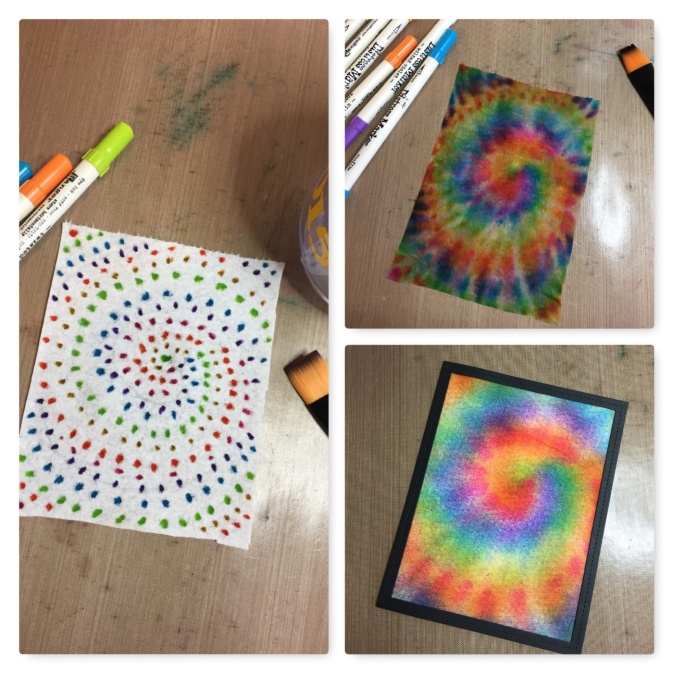
My dude was just screaming out for some tie-dye. I tested a few watercolor techniques, but couldn’t quite get the streaky, fabric look I was after. So, I decided to try to use a paper towel as my “paper”. I chose a Viva brand towel because it’s very cloth-like and doesn’t have any embossed patterns. I “drew” a spiral pattern on the towel using Distress Markers (see image below, left). Then, I used a flat brush and clean water to make it come alive. I started from the center of the spiral, and brushed lightly (more like a dab) outward. The pic on the top right, below, shows the paper towel directly after all the water was applied – it was very, very wet. I didn’t blot it or heat set it – just let it dry naturally overnight.
I was super happy with the result the next morning 🙂 . I trimmed it up, backed it with some scrap white cardstock (black cardstock dulled it a bit), then added a frame I cut out of black card stock using a Lawn Fawn Stitched Rectangle Frame die. The picture on the bottom right, below, shows the completed background.
To finish off my dude card, I made a peace sign in my Brother ScanNCut and cut it out of black cardstock. If you don’t have one of these machines, it would be easy enough to make a peace sign out of a couple of circle dies and strips of cardstock. I didn’t have a stamp with a sentiment that seemed appropriate, so I wrote “Peace Out” on some black cardstock with my white gel pen and trimmed it out. Some foam tape to pop-up my hippie dude, and this card is done!

Now, on to my hippie chick! She was in need of some flower power! For her background, I started by writing the sentiment, “Feeling Groovy?” on the smooth side of a piece of Distress Watercolor Cardstock using a white Ranger Emboss-It pen. I heat-embossed the sentiment with clear embossing powder. Next, I used Distress Inks and a basic watercolor brush to get a layer of color down. I alternated with water spritzes and more color until I was happy with the look.
After heat setting the background, I used the oval of flowers stencil that came with my Simon Says Stamp March 2017 kit to add some flowers to background. I masked off the portions of the stencil that I didn’t want, and used my blending tool to ink the flowers. I heat set the panel again, then used my white gel pen to add some white doodles to the flower shapes. I also used Distress Markers in Weathered Wood and Picked Raspberry around the sentiment to give it some shadow and make it appear more distinct from the background.
To finish off the front, I used the Simon Says Stamp Stitched Rectangle die and then backed the panel with some medium pink cardstock.

All that was left was adding some foam tape to pop-up my chick, and adding the front panel to a white card base. My Flower Power hippie chick is ready to party!

Enter to Win

Thanks for stopping by and I hope you had a groovy time! I’m looking forward to seeing what you make! Don’t forget to upload your Tim Holtz Rainbow projects for your chance to win a $50 gift voucher to the Simon Says Stamp store!
Tools and Supplies
Here’s a listing of the supplies and tools I used in my project:
- Tim Holtz Crazy Birds Stamps and Dies
- Tim Holtz Distress Inks:
- Dude character: Carved Pumpkin, Mermaid Lagoon, Twisted Citron, Fossilized Amber
- Chick character: Spun Sugar, Picked Raspberry, Squeezed Lemonade, Tumbled Glass
- Chick background: Spun Sugar, Squeezed Lemonade, Tumbled Glass, Broken China, Milled Lavender, Shabby Shutters, Worn Lipstick
- Tim Holtz Distress Markers:
- Tie dye background: Wilted Violet, Mermaid Lagoon, Twisted Citron, Fossilized Amber, Carved Pumpkin, Picked Raspberry
- Other: Picket Fence, Weathered Wood
- Tim Holtz Distress Marker Spritzer Tool
- Tim Holtz Water Brush
- Tim Holtz Tonic Craft Scissors
- Tim Holtz Distress Collage Medium
- Tim Holtz Collage Brush
- Tim Holtz Distress Watercolor Cardstock
- Ranger Ink Blending Tool
- Ranger Texture Paste
- Ranger Glossy Accents
- Ranger Emboss-It Pen
- Sizzix Big Shot
- Fiskars Trimmer
- Lawn Fawn Stitched Rectangle Frames
- Simon Says Stamp Stitched Rectangles
- Simon Says Stamp Oval of Flowers Stencil
- Wink of Stella pen
- Signo White gel pen
- 1/8″ double-sided tape
- Foam adhesive
- Hemp cord – black
- Simon Says Stamp clear embossing powder
- Cardstock: Neenah Solar White 80#, Neenah Solar White 110#, Black Cardstock, Medium Pink Cardstock


Oh my goodness Amy! I absolutely LOVE these!!! they really made me smile with their funky hairdo’s and bright rainbow colours! absolutely brilliant!! 🙂
I am so glad you have joined us this month and looking forward to seeing what you create for the upcoming challenges! 🙂
luv
Lols x x x
LikeLike
Your cards are fabulous, Amy! These made me laugh and smile. What a great way to start a Monday morning!! The hippie dude is hilarious with his shaggy hair and glasses and the groovy chick with her hairdo is such a kick! So original and so much fun. Thanks for joining us this month on the challenge, I love your amazing talent and I’m so excited to have you here with us this month. Welcome!
LikeLike
I absolutely love both cards. The Hippie birds are fantastic. What a clever idea to turn them into so cool creatures. I love the backgrounds with such a plenty of colors! Hugs, Marzena
LikeLike
FABULOUS WORK! LOVE THEM BOTH.
LikeLike
These cards are super cool, never would have thought to make a tie dye with a paper towel. The crazy birds look amazing in their hippy out fits. Love the hairdo’s! So happy you’re our GD this month! Hugs, Sandra
LikeLike
Love Tim’s things too -the card is Groovy. Tie dye background is awesome
LikeLike
What a treat to have you be a Guest Designer with us! Your aesthetic has always made me smile and what a WOW you started out with! You really took those crazy birds to a new level of brilliance. And if there was an award for the coolest use of a paper towel ever, it would be yours for sure! I enjoyed seeing both of these so very much and I can’t wait to see what else you have up those clever sleeves of yours!
LikeLike
cute and fun cards-love those birds!
LikeLike
Welcome Amy! These hippy birds just make me giggle with delight! Love the bright colors and the awesome hair!! Wonderful and creative, and definitely putting me into the feeling groovy mood! hugs, Maura
LikeLike
Oh, my goodness. I was so captivated with your description on how you made these hippie birds!!! I just love what you did – so so clever – the cotton ball haired cutie is my fave!!! I was LOL the whole time!!! Thanks for sharing
LikeLike
So very, very cool! These HIP Birds are the best theme I’ve seen to date. I love them, absolutely love them. Wish there was a video ’cause I’ve never used my Holtz Spritzer after picking one up for a great bargain last year. Although, I do think there’s possibly one on YouTube :). The Peace sign is awesome as are the two cards. Thanks so much – made me smile right-off . Denise, A Child of the Sixties!
LikeLike
I just had to return to say making these cards just had to be so much FUN! Denise
LikeLike
What great cards! I absolutely love them and have to try them myself, especially the tie dye one! Thanks for sharing!
LikeLike
Beautiful love the brights and pastels too
LikeLike
Welcome Amy, it’s going to be lovely having you join us this month and these cards are just so much fun! I love how you’ve created those crazy little hippy birds complete with their groovy little wigs…they look so cool! Love them… 🙂
LikeLike
Both cards are so fun and fabulous! Amy. It’s so great to have you as our guest designer at Simon Says Stamp Monday Challenge. Love and hugs. 🙂
LikeLike
These are fantastic Amy! I love both cards and you used such fun techniques. Everything from the background, colours, hairstyles and the peace sign is just perfect. Thank you for being our guest designer this month!!
LikeLike
super cool cards Amy…love what you did with these adorable Crazy birds…so happy to have you join the team for the month of April…can’t wait to see what else you have in store for us….hugs kath xxx
LikeLike
Welcome Amy! both your cards are absolutely fabulous! The idea of use a paper towel as a base is so brilliant! Great work! I can’t wait to see what you create during this month! barbara
LikeLike